


1 PRODUCT DESCRIPTION
The B.One Device Manager app is a mobile application for Android devices , specifically designed for configuring ZENNER devices and for wireless M-Bus-enabled meter readings . The app enables simple and efficient remote meter reading , both via walk -by and drive- by methods.
Main functions:
- Automatic and manual reading or radio reception of measuring device data.
- Device configuration via infrared (IR) or NFC.
- Management of device keys for encrypted data transmission.
- Management of selection lists for targeted data collection.
- Data export to CSV or PDF for further processing.
The B.One Device Manager is exclusively for ZENNER customers. The app is designed for professionals in meter reading and device configuration (not for private individuals) and offers an intuitive user interface for quick and reliable use.
2 Installation and commissioning
2.1 System requirements for the mobile device
The mobile device used should meet the following minimum requirements:
- Operating system: Android 8.0 or higher
- Camera capable
- Bluetooth and NFC interface
2.2 Download and Licensing
- The B.One Device Manager app can be downloaded and installed from the Google Play Store. A valid license is required to use the app’s features.
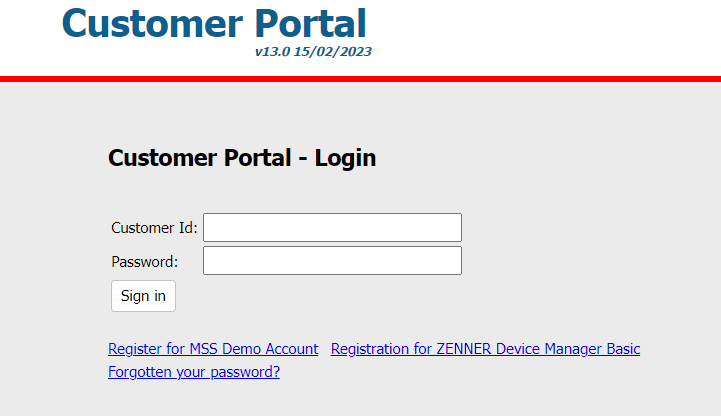
- Customers from Germany can set up an account for the B.One Device Manager and acquire a license via the ZENNER portal ( https://mssportal.zenner.com ). International customers should contact their local distributor to obtain a license.
- After successful registration, you will receive a confirmation email with a verification link. Click on this link to complete the registration.
- Enter and confirm your individual access password on the page that opens.
- After completing this step, you will be assigned a customer number for the portal, which will be sent to you by email. This number and password will be used to log in to the ZENNER portal from now on.
- Under the My App tab A license can be generated in the form of a QR code. This QR code can be used to activate the app on a mobile device.
- Additionally, two CSV files are available for download in the same area:
- A file for the READ OUT MANAGER that can be used to create and import readout lists.
- A file for the KEY MANAGER , which allows serial numbers and keys to be loaded into the app
2.3 Commissioning the B.One Device Manager
When you launch the app, you will be asked to authenticate yourself once. Please ensure you have a stable internet connection. To do this, scan the QR code from the ZENNER portal with your mobile device.
Step-by-step instructions :
- Open the app: Launch the B.One Device Manager app.
- Scan QR code: You will be prompted to scan the QR code from the ZENNER portal. Tap on SCAN QR CODE.
- Grant access permission: The app needs access to your mobile device’s camera. If this hasn’t already been done, allow access in your device settings. To do this, tap OK in the pop-up that appears.
- Place QR code: After approval, a camera view will open in the app. Position the camera so that the QR code is fully visible within the view.
- Scan and confirm: The QR code is read automatically. After successful scanning, a confirmation page will appear. You will be redirected directly to the B.One Device Manager start menu.
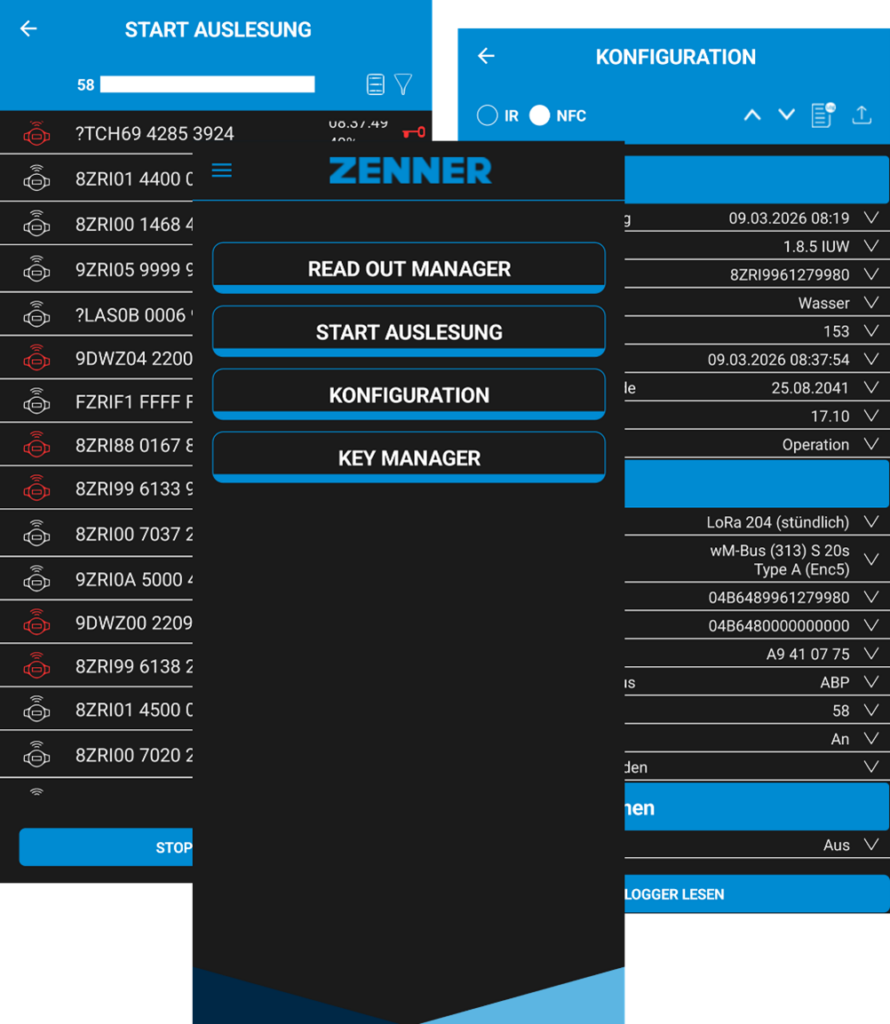
3 FUNCTIONS AND MENU STRUCTURE
3.1 Main functions
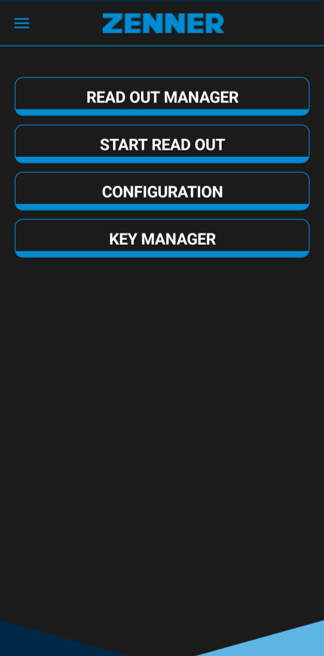
You can select all the app’s important functions directly from the home screen:
- READ OUT MANAGER: Uploading and managing readout lists .
- START READOUT: Detection of all wireless M-Bus-enabled measuring devices within range. If a readout list is used, only the devices listed therein will be read.
- CONFIGURATION: Initial installation and configuration of measuring devices.
- KEY MANAGER: Storing and managing the radio keys and configuration keys for the devices to be read.
3.2 Navigation
The app’s main menu is accessed via the hamburger menu. ( ☰ ) accessible in the upper left corner. It contains the sections PAIRING , INSTRUCTIONS , PRODUCTS , GENERAL and Settings .
4 Hamburger Menu ( ☰ )
4.1 Settings
4.1.1 App Sound
The B.One Device Manager emits audible signals for successful actions and errors. These tones can be enabled or disabled in the settings via a switch.
4.1.2 Language settings
The app supports multiple languages, including German, English, Italian, and French. By default, the app uses the language of the mobile device. If an unsupported language is set on the mobile device, the app automatically switches to English.
The language can be changed at any time in the Language menu. The date format can be changed. The date display varies depending on the language setting.
- German : DD.MM.YYYY
- English : YYYY.MM.DD
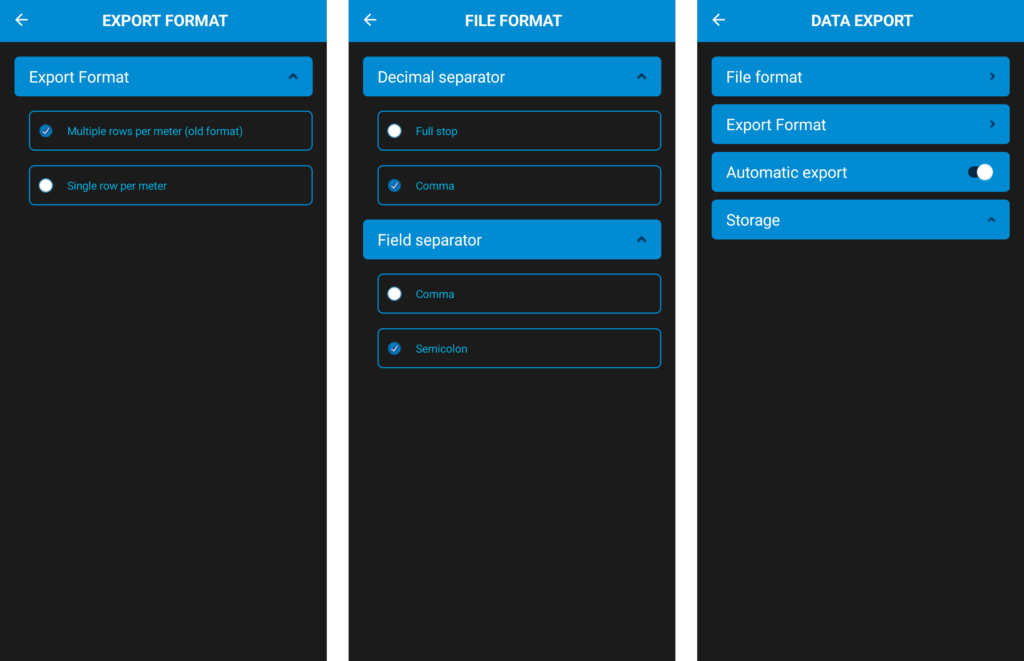
4.1.3 Data export
In the data export settings the following options can be configured:
- File format : Choice between decimal separator “period” or “comma” and separator “comma” or “semicolon”.
- Storage options: Data can be saved automatically (default) or manually. To enable manual saving, automatic export must be disabled.
- Storage location : The destination folder for the export can be selected and adjusted by clicking on “Storage location”. The current storage path is displayed directly below this option.
- Export format: Here you can choose between the options “Multiple lines per counter” or “One line per counter”.
4.1.4 Updating the license
The app’s license can be changed via the License menu. To update the license a new QR code has tobe scanned:
- Tap on ” Change license” .
- access to the camera (if not already done).
- Scan the new QR code to update the license.
4.1.5 Permissions
Under Permissions , required app access rights can be managed. This includes permissions such as camera or storage access. Permissions that were previously refused can be granted again here.
4.2 Instructions
Under “Instructions” you will find brief descriptions of selected app functions. Detailed instructions can be found in this user manual.
The configuration instructions for the respective devices are being created gradually and are available on the corresponding product pages at www.zenner.de .
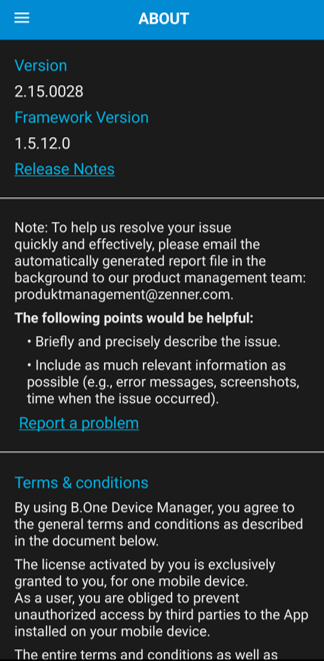
4.3 ABOUT
The “About” section contains important information about the app, including:
- Contact us for support requests
- Current app version
- Framework version of the application
- Valid terms of use
- Privacy policy and information
- Link to the release notes , which describe changes and new features.
- “Report a problem” button: You have the option to report a problem directly from the app. A log file is automatically created, which can then be sent to support or product management for analysis.
- ZENNER Newsletter: You have the option to subscribe to the ZENNER newsletter to always be up-to-date on the latest ZENNER developments.
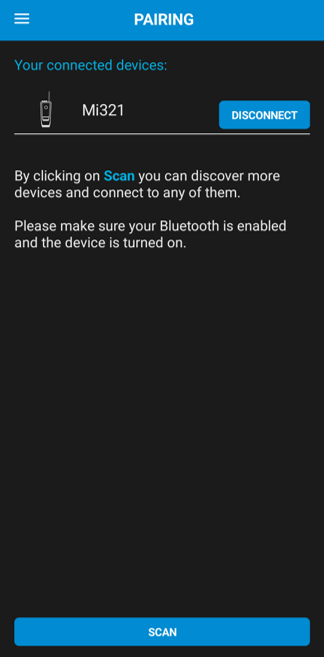
4.4 Pairing
In the pairing area, the connection with the MinoConnect devices can be established. BluetoothRadio , MBWBLUE and K01-Blue 3000 are manufactured. Before pairing, ensure that:
- the device is switched on.
- it is not already connected or paired with another device.
Two connection options are available via the mobile device’s Bluetooth settings:
Connection via the mobile device’s Bluetooth settings:
- Open the Bluetooth settings on your mobile device.
- Search for available devices and select the desired device.
- Perform the pairing process to connect the device to the mobile device.
Connection via the “Pairing” menu within the app:
- In the app, navigate to the PAIRING menu item.
- Select the “SCAN” option
- All available MinoConnect devices will be displayed automatically.
- Select the desired device from the list of detected devices and choose the “Connect” option. The connection will then be established automatically.
The connected device will appear in the PAIRING menu and is ready for further use. To disconnect, select the “Disconnect” option.
5 CONFIGURATION
In the CONFIGURATION section, you can configure your ZENNER measuring devices or read out the logger data. Depending on the measuring device, the connection is made via infrared or NFC interface.
The configuration instructions for the respective devices are being created gradually and are available on the corresponding product pages at www.zenner.de .
5.1 Infrared interface (IR)
To use the infrared (IR) interface, your MinoConnect Bluetooth Radio or K01-Blue 3000 must be connected to the mobile device. The MinoConnect Bluetooth Radio must be equipped with an optical sensor.
If multiple receivers are connected, you can select the desired device for configuration from a drop-down menu in the IR section.
Another drop-down menu allows you to select a device group. This automatically sets the appropriate settings for data retrieval.
The available device groups for MinoConnect are:
- Default (EDC, PDC, NDC, HKVE, T+H)
- EASY PROTECT smoke detector
- Heat meter C5
- NFC via NDC (Enables reading the NFC interface via IR)
- WR3, C2 (readout)
Available device groups for K01-Blue 3000:
- default
With this setting, all ZRI devices with an infrared interface can be read. Please note that for the C5 heat meter, the button on the device must be pressed before reading the data.
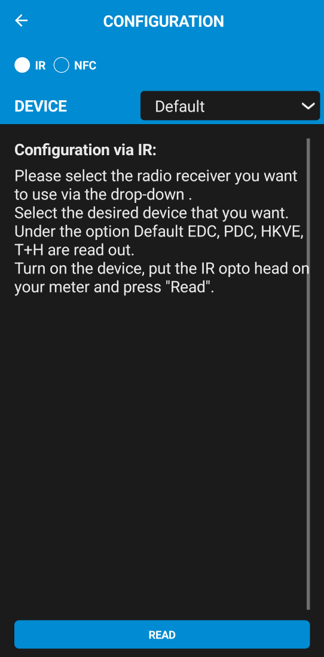
Device configuration via IR, step-by-step
- Read device information:
- Position the optical head in the designated location on the ZENNER device.
- Select the appropriate device group.
- Press READ.
- View device settings:
- After successful data retrieval, the device settings will be displayed.
- Variable parameters are marked with a pencil symbol.
- Adjust parameters:
- Tap the pencil icon of the parameter you want to change.
- Make the desired adjustment — depending on the parameter, by entering text or selecting from the drop-down menu.
- Write changes:
- Reposition the optical head in its designated location on the device.
- Press WRITE to save the changes.
- Confirmation:
- A confirmation icon will appear in the app after successful configuration.
- Check new settings:
- Perform another scan to verify the updated settings.
- You can use the arrow keys to view additional details about each parameter.
Note: During each data retrieval process, the app automatically checks the firmware version of the MinoConnect Bluetooth radio. If the firmware is outdated, an update will be offered.
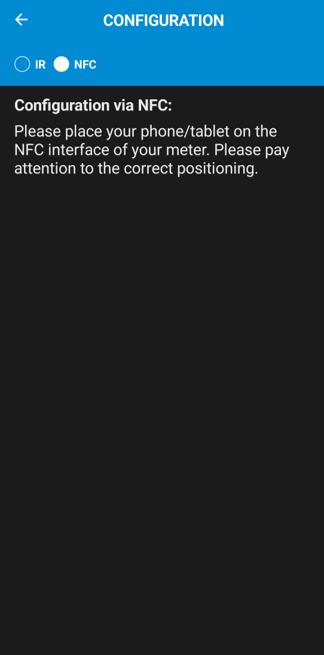
5.2 NFC interface
The NFC interface enables quick and easy configuration of ZENNER measuring devices.
Device configuration via NFC step-by-step
- Read device information:
- Select NFC in the app.
- Place the NFC interface of your mobile device in the designated area of the ZENNER measuring device.
- The reading process starts automatically as soon as the NFC connection is established.
- View device settings:
- After successful data retrieval, the device settings will be displayed.
- Variable parameters are marked with a pencil symbol.
- Adjust parameters:
- Tap the pencil icon of the parameter you want to change.
- Make the desired adjustment — depending on the parameter, either by entering it or by selecting it from the drop-down menu.
- Save Changes:
- Tap WRITE.
- Hold the NFC interface of your mobile device against the designated spot on the ZENNER measuring device again.
- The app automatically detects the connection and begins the configuration.
- Confirmation:
- After successful configuration, a confirmation message will appear in the app.
- Check result:
- Read the device again to verify the updated settings.
- You can use the arrow keys to view additional details about each parameter.
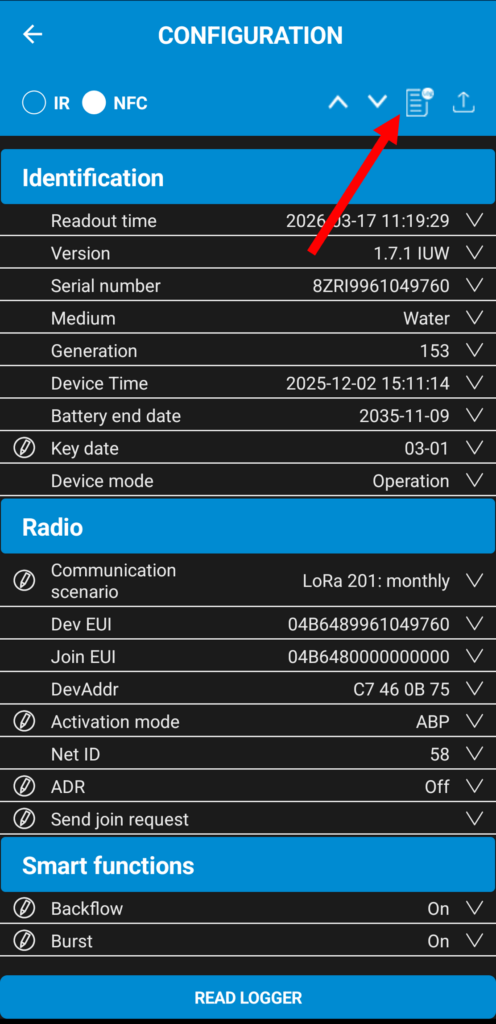
5.3 Reading out logger data
The logger function allows you to retrieve and export historical measurement data from a ZENNER device.
Reading out the logger step-by-step:
- Read device information:
- Read the device via the infrared interface or the NFC interface (see step 1 in the relevant sections).
- Find the logger icon:
- After successful data retrieval, the logger icon (log) appears in the upper right corner of the screen.
- View logger data:
- Tap the logger icon to view the saved logger data.
- Export logger data:
- Press the Export button.
- A pop-up window appears with the export options CSV or PDF.
- Select the desired file format — the logger file will then be saved.
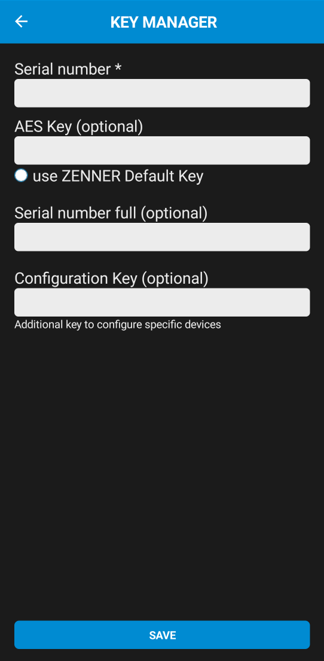
6 KEY MANAGER
In the KEY MANAGER you can import, manually enter or manage the AES keys for your ZENNER devices.
Ways to input AES keys:
- CSV Import: Upload a CSV file from the ZENNER delivery note portal or create your own file. Ensure that all necessary information is entered correctly.
- CSV download: You can download a blank file to fill out from the ZENNER Customer Portal .
- Manual entry: Enter the AES keys directly in the B.One Device Manager .
Notes:
- Devices with a factory key can be read automatically, without importing the data.
- When importing keys for retrofit modules, the EDC/PDC module number must first be replaced by the counter number of the connected device programmed into the EDC/PDC.
6.1 Importing the CSV file
With the KEY MANAGER You can easily import your ZENNER devices, including AES keys, via CSV file.
- Preparing the file: Save the CSV file to your device. A template is available in the ZENNER portal (see section 2.2).
- KEY MANAGER : Start the B.One Device Manager and navigate to KEY MANAGER.
- Start import : Tap the import icon and select the file.
- Check import: The imported devices and AES keys appear in the app.
- Troubleshooting: Error messages are displayed. An error file helps with correction. A CSV file containing the error description is automatically saved—this allows you to correct the information and repeat the import.
An example of the template:
PrintedSerialNo ( required field ) – Water meter number for a factory-installed meter
Module number for a retrofit module
AES_Key ( Optional field ) – Your AES key
SerialNoFull ( Optional field ) – Serial number of the module for a factory-assembled counter
| PrintedSerialNo | AES_Key | SerialNoFull |
| 8ZRI6670202107 | YOUR RANDOM AES KEY | EZRI0Z50139780 |
| EZRI0H50140010 | YOUR RANDOM AES KEY |
Tip: You can return to the B.One Device Manager at any time without performing the import by using the back button on your mobile device.
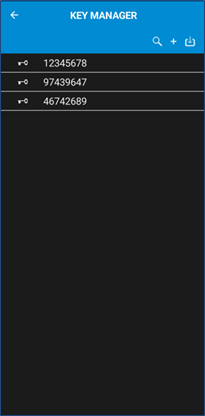
6.2 Adding devices manually
If you want to add devices without CSV import, you can enter the data manually.
Manually adding devices step-by-step:
- Open KEY MANAGER:
- Start the B.One Device Manager app and navigate to KEY MANAGER .
- Create new device:
- Tap the plus icon to add a new device.
- Enter device data:
- Serial number: Enter the serial number of the measuring device.
- AES Key: Enter the AES key for wireless M-Bus readout .
- Full serial number (optional):
- For devices with a separate radio module: serial number of the radio module.
- For devices with an integrated radio module: serial number of the measuring device.
- Configuration Key (optional): Some devices require a configuration key for parameterization. If your device requires such a key, enter it here.
- Save entries:
- Press “Save” to add the device.
- Check device list:
- After saving, the device appears on the KEY MANAGER homepage with all stored data.
6.3 Managing devices
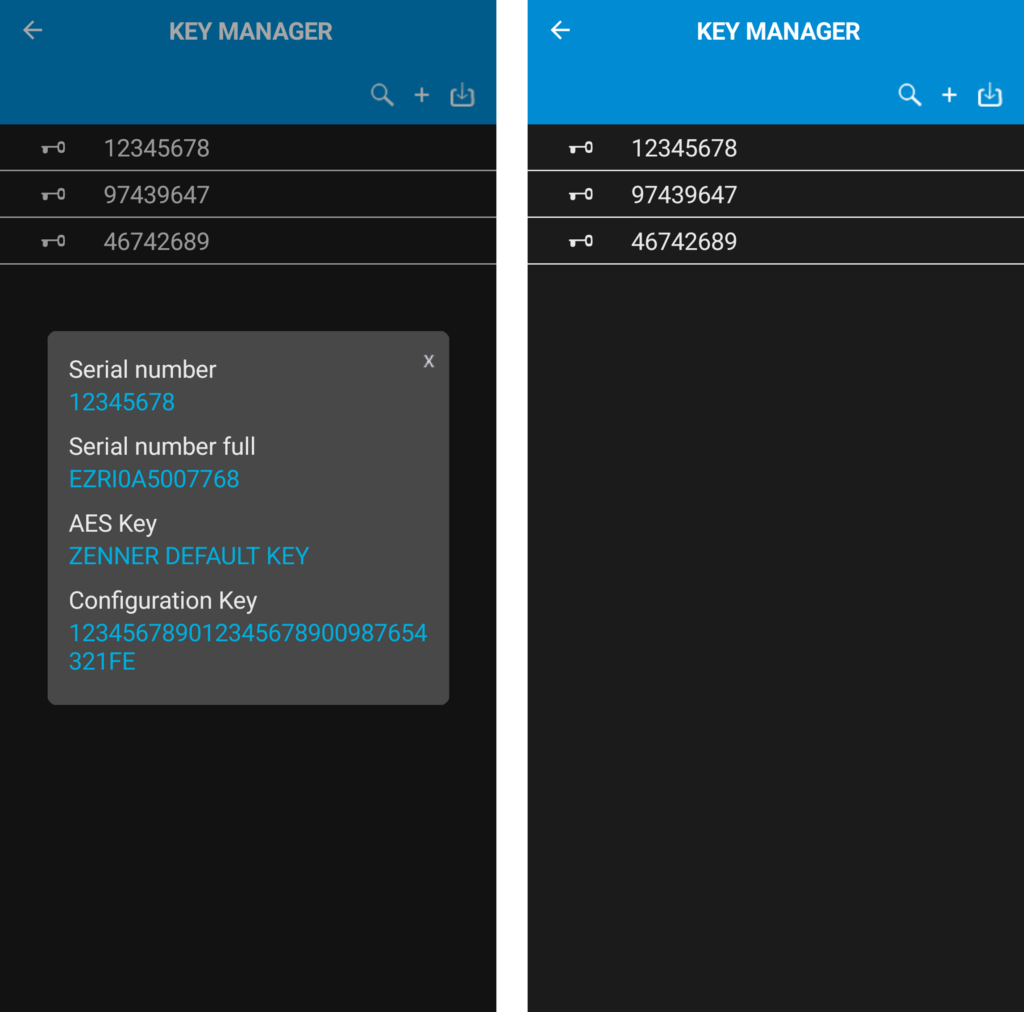
The KEY MANAGER displays an overview of all stored ZENNER measuring devices on the homepage.
View device details:
A short tap on the serial number opens a pop-up window with the stored information:
- Serial number
- AES key
- Full serial number
- Configuration Key (if available)
Delete devices:
- Long press: Press and hold a devicein the list to activate multi-selection mode.
- Select multiple devices: Select multiple devices individually or tap “Select all”.
- Confirm deletion: Press the delete icon and confirm in the pop-up with “Delete”.
- Cancel deletion process: Select “Cancel” to end the process without making any changes
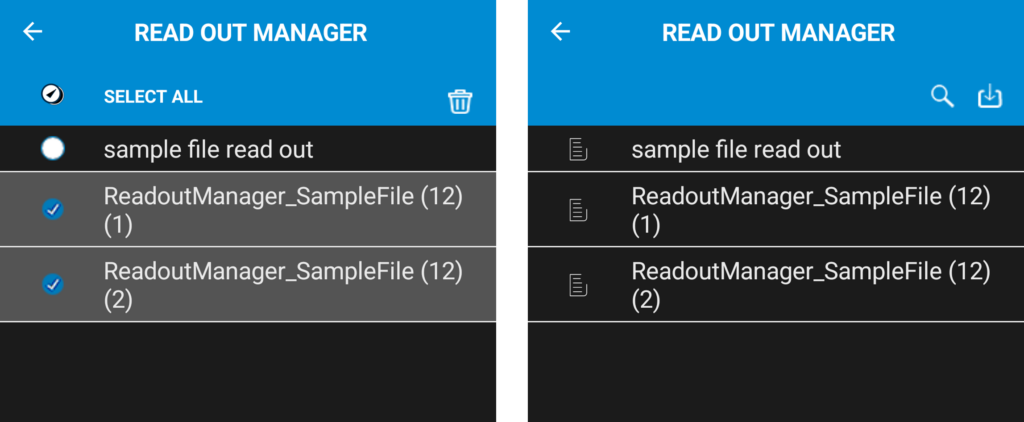
7 READ OUT MANAGER – Manage readout lists
In the READ OUT MANAGER, you can import, manage, and delete readout lists. A blank file for creating new lists is available in the ZENNER Customer Portal.
7.1 Reading a selection list
- Prepare the selection list:
- Save the readout list to your mobile device (device memory or SD card).
- The blank file can be found in the ZENNER Portal (see section 2.2).
- Open B.One Device Manager:
- Navigate to the READ OUT MANAGER menu.
- Start import:
- Tap the import icon (top right).
- Select file:
- Your device’s file manager will open.
- Navigate to the storage location and select the desired file.
- Confirm import:
- A confirmation page will appear after a successful import.
- The selection list is displayed in the READ OUT MANAGER.
| Serial number* | Street | No. | Postal code | City | comment | Radio module number |
| 8ZRI9912345678 | Heinrich Barth Str. | 29 | 66115 | Saarbruecken | x | 0000 |
| 4ZRIFC80020949 | Unterer Friedhofsweg | 8 | 66538 | Neunkirchen | x | 0000 |
7.2 Searching for selection lists
- Tap the search icon .
- Enter the name of the selection list in the search field.
- results lists that match the search will be displayed .
7.3 Deleting selection lists
- Activate delete mode:
- Press and hold (~ 2 seconds) the list to be deleted.
- Use multiple selection:
- The selected list will be highlighted.
- You can now select additional selection lists or tap “Select all”.
- Complete deletion process:
- Tap the delete icon.
- Confirm the security prompt in the pop-up by clicking “Delete”.
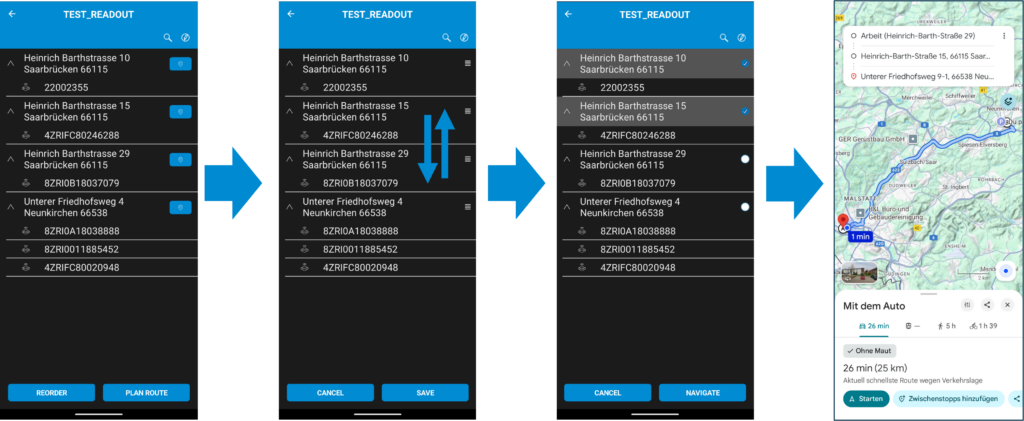
7.4 Route planning
After selecting the desired list, all included addresses and their associated counters are displayed. To start route planning, the following steps can be performed:
- By tapping the GPS symbol to the right of the address, navigation to that specific address can be started directly.
- The “Reorder” function allows you to rearrange addresses to optimize route planning. To do this, briefly press and hold the address you want to move and drag it to the desired position. Confirm with “Save”.
- To start route planning, select the “Plan route” option. Select all desired addresses and confirm your selection by clicking the “Navigate” option.
- Confirm the Google Maps pop-up and check the navigation route. If all entries are correct, you can start navigation as usual via Google Maps.
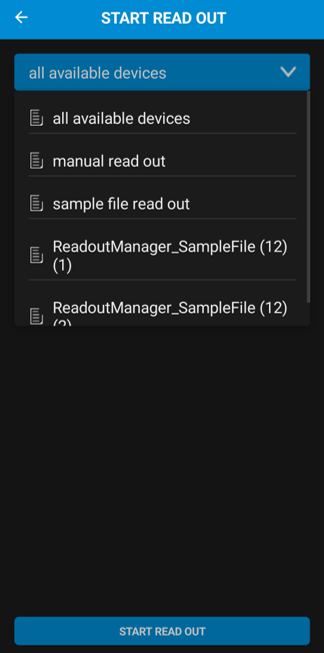
8 measuring devices – START READ
In this section, you start the data retrieval process for ZENNER measuring devices. The first time you open the “START RETRIEVAL” menu, you will be asked once for the desired storage location for the data retrieval. You can specify this directly via the B.One Device Manager:
- Free readout: All devices within the reception range of the MinoConnectRadio or MBWBLUE will be read out.
- Selection list: Only devices from a previously stored selection list will be recorded.
- Manual readout: Devices that are not received can be entered manually.
If multiple devices are paired, you can select the desired receiving device (e.g., MinoConnect) from the additional drop-down menu.
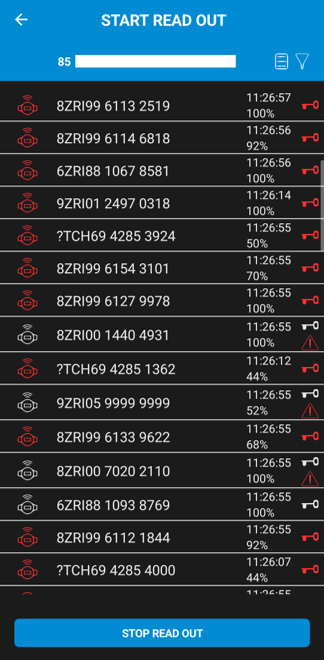
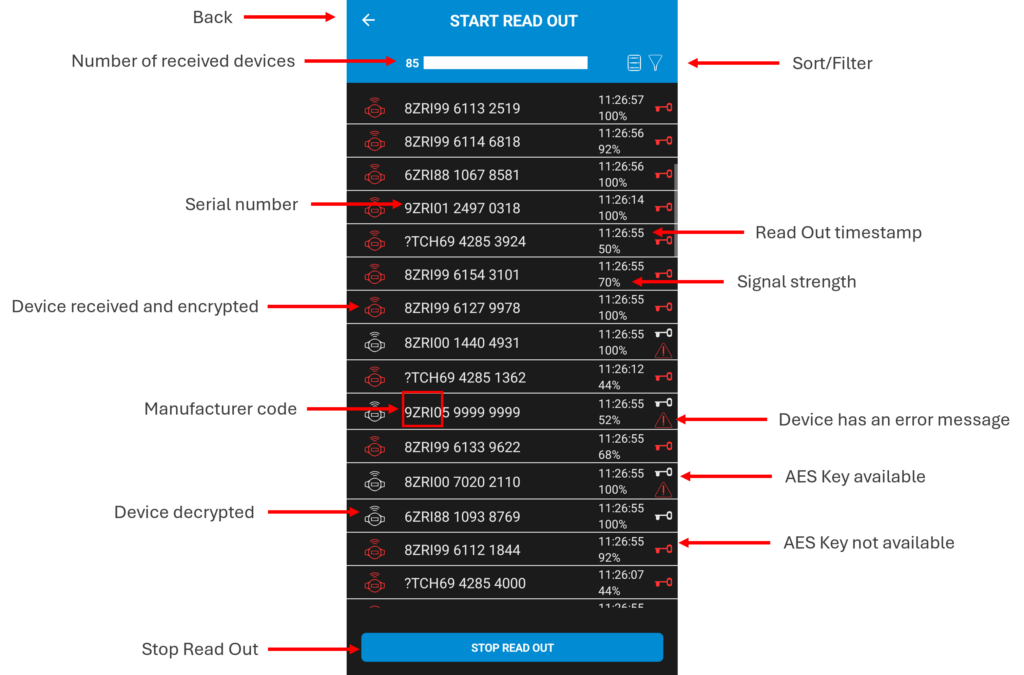
8.1 Wireless M-Bus read out
- Tap “START READ” to start the process.
- An empty list appears, which gradually fills up as devices are received.
- Free readout: A counter bar displays the number of devices received.
- Selection list: The bar shows the percentage progress based on the selection list.
- The read devices are displayed with their address and serial number.
- Partial saving of this device can be done via the button to the right of the respective device.
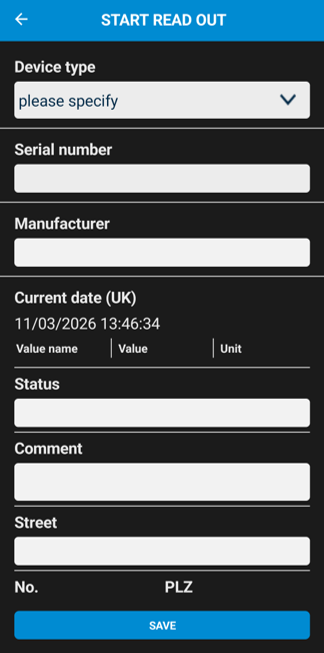
8.2 Manual data entry without a selection list:
- Select the “Manual readout” option from the drop-down menu and click “START READOUT”.
- In the blank window you can:
- Enter device type, serial number, manufacturer and measured values.
- You can add status messages and comments.
- Enter city, street, house number and postal code.
- After entering your information, click “SAVE”.
- The device appears in the list, highlighted in light blue and marked with an “M” for manual.
Storage :
- Manual: Data must be exported via the export icon.
- Automatic: Data is saved automatically when you leave the menu.
- Export: Manually entered devices are marked with “New device ” in the file.
8.3 Manual data entry with selection list:
- Select a list to be read and click “Start reading”.
- Devices not received? A pop-up asks if they should be manually detected.
- “Yes” → Select the devices that were not received via the drop-down menu.
- “Add manual readout” opens the input page (serial number from the list is pre-filled).
Storage:
- Manually: Export data using the export icon.
- Automatic: Data is saved automatically when you leave the menu.
- Export: Manually entered devices are marked with “New device ” in the file.
8.4 Symbols in the selection list:
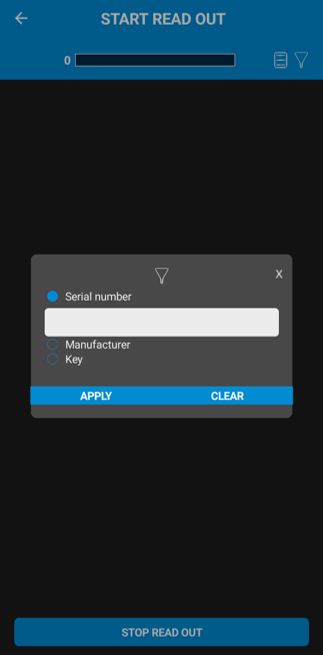
8.5 Filter
Filter options :
- Serial number:
- Enter the desired serial number or part of it. Suitable measuring devices will be displayed.
- Medium:
- Select the desired medium from the drop-down menu.
- Manufacturer:
- Enter a manufacturer’s abbreviation (e.g. ZRI for ZENNER International) to display suitable measuring instruments.
- Key present/missing:
- Select either “Available” or “Not available” from the drop-down menu to display measuring devices with or without a stored key.
Actions :
- Apply: Updates the list according to the filter criteria.
- Delete: Resets the filter and returns to the previous view.
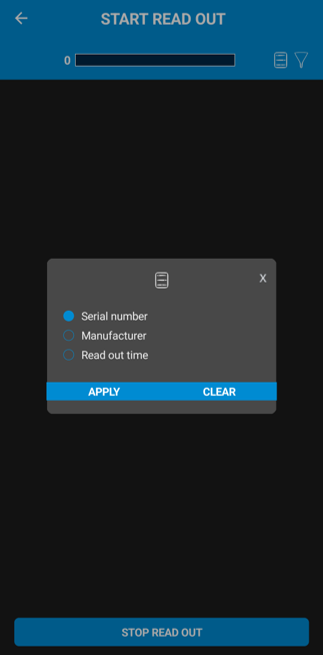
8.6 Sorting
The sorting icon in the middle allows you to sort the received measuring devices by serial number, manufacturer, or readout time.
- In the pop-up window, decide which criterion should be used to sort the list.
- Confirm with “OK” to update the list accordingly.
- Pressing “DELETE” resets the sorting and returns you to the previous view.
8.7 Exporting data
Data export occurs automatically after each readout if the automatic export option is enabled in the settings. With the manual export option, the data must be saved manually by tapping the export icon. If this is forgotten, the app will remind you before exiting the readout menu and ask if you want to save any unsaved data.
Updated: 10 March 2026
9 CONTACT
ZENNER International GmbH & Co. KG
Heinrich Barth Str. 29
66115 Saarbrücken
Germany
E-Mail: info@zenner.com
Phone: +49 681 99 676-30
Internet: www.zenner.com